Configuration guide
Know-how from Successful Forex Scalpers.
|
Table of Contents: Click on a link to skip to the section you need, or if you are a beginner, start from the top. |
Preamble
Aggressive Trend Scalper is user friendly automated trading system also known as forex trading robot. It's default configurations are optimized for good results with minimum risk for your capital. No matter of market movements. Default logic follow the way of trading of skilled professional traders. Depending of invested capital, the contract with the broker and the acceptable risk according your point of view, default settings can be impropriety for trading. At some cases the profit will be much bigger if you accept higher level of risk. In order to don't interfere of your decisions, we created this guide. Read it. Configure the robot to do exactly what you want. The system is very flexible and will follow your rules.
General Setup
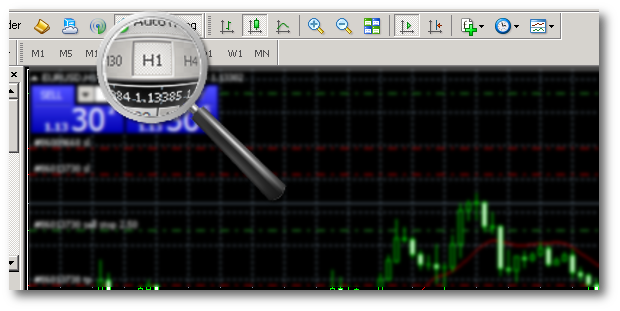
Aggressive Trend Scalper is designed and optimized for work at 1 hour (H1) time frame. The author says that best results are achieve with H1. So before start the expert, you must switch your graphic to H1 mode. Click on H1 button, as shown:
Now you are ready to assign the expert to the graphic and start the auto-trading. Keep in mind that it can work with any other time frames. Don't forget to switch the graphic to H1 mode. This is very important step. Trading with other time frames will be on your own risk. The results of trading with time frame different from H1 will be unpredictable.
Drag'n'Drop to the graphic.
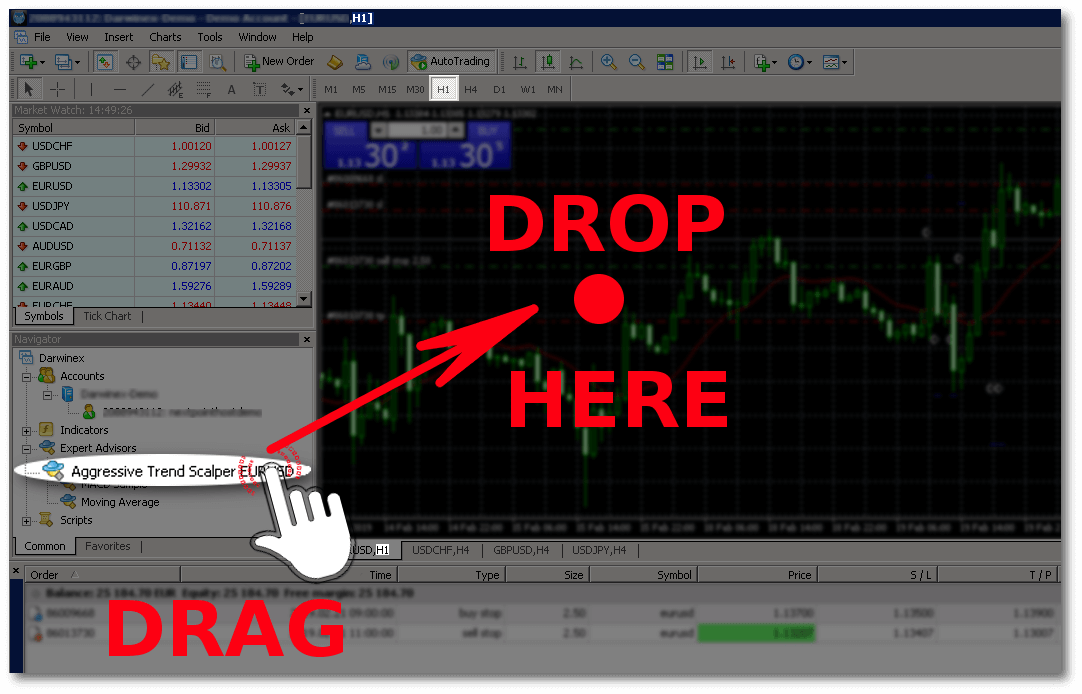
You'll see the configuration window. It contain four tabs. Each tab contain specific information or setting. These tabs will be used for modification of your trading. Read next lines of the tutorial in order to understand what settings to change, before to activate the expert.
Common tab
This tab open by default, when you "Drag'n'Drop" the expert to the graphic. In practice this is the section, that starts or stops the robot. The most important settings here are "Allow DLL imports" and "Allow live trading". Put check marks on the both settings, as shown on the picture below. Otherwise the expert will not run.

Allow DLL imports
- NextPointHost is the only hosting provider who allow that feature. Official explanation of competitors is that the it is disabled due to security reasons. We agree that functionality can be exploited by hackers. But we are not agree with the statements that function must be completely disabled. Because the hackers can exploit any other functionality of MetaTrader platform with the same success. The right way for protection is to use only certified expert advisors (EA). These experts are created by well known authors with perfect reputation. They are passed security audits. They have clear, well structured documentation and so on. Disabling of Dynamic-link library (or DLL) as a method of protection is a silly action. Head burial in the sand. It will not protect you from scams or fake experts, created with idea to harm your trading environment. Be smart. Don't allow to be misled by any false statement on the web. The DLL files were used by Microsoft since first version of Windows OS until today. MetaQuotes use such files inside the MetaTrader platform. There is not reason expert developers to don't use the same technologies inside their products. More information can be found in the article "What is a DLL?" on Microsoft website.
Allow live trading
- Option enable or disable the performing of trade operations by Expert Advisor. If it is disabled, the Expert Advisor will work, but it won't be able to trade. This limitation can be useful for testing the analytical capacity of the Expert Advisor in the real-time mode. Note that even if the option is enabled, the autotrading for the Expert Advisor may be disabled by the general settings of the terminal using
 button on the toolbar. This button enables/disables autotrading for the entire terminal. If you disable it, no Expert Advisor will be allowed to trade, even if you enable autotrading in the EA settings. If you enable it, the Expert Advisors will be allowed to trade, if autotrading is enabled in their settings.
Specify the direction of position opening

- Long & Short – in both directions. This is the recommended setting.
- Only Long – only for buying.
- Only Short – only for selling.
The above three settings are mandatory, because control the behavior of the expert.
Optional options
- Allow import of external experts
- Allow modification of Signals settings
- Enable alerts
- Disable alert once hit
You can set it according your trading vision. They don't influence the logic of decision making by Aggressive Trend Scalper. To be 100% useful this tutorial, we'll say and a few words about them.
Enable alerts
- Enable/disable the expert to alert. Due to fact that you are configuring fully automated trading system, where you'll not constantly watching what happens on the screen, we consider that the recommended setting is "Disable".
Disable alert once hit
- Disable alerts after the first alert has been given.
Allow import of external experts
- Enable/disable calling of functions from external experts. The Aggressive Trend Scalper is designed as fully automated trading system. It's not tested for compatibility with other experts. Probably it will works without problems with other experts, but we don't know what will be the trading results. That's why the recommended setting "Disable". Composition the system with other systems will works on your own risk. The trading results will be unpredictable.
Allow modification of Signals settings
- Option allows/prohibits the expert to subscribing and unsubscribing from Signals as well as changing the settings of signal copying. The Aggressive Trend Scalper performing own analysis of the market. Copying of signals from 3rd party applications will confuse the own trading logic. We recommend to don't use trading signals, when you are trading with this system.
Inputs
The detailed parameters of the expert can be changed in the "Inputs" tab.

To save an input, one has to double-click with the left mouse button on its value and write the new one. At that, one can change the value of each variable or download the set of inputs already saved, using the "Load" button. One can save the current set of parameters using the button "Save".
The "Reset" button returns all default settings. To attach the expert with the new parameters to a chart, must to press "OK". To cancel the expert imposing, one has to press the button "Cancel".
The values of each parameters
In order to understand how to configure the expert at best possible way. In next lines you will read the recommended values by the expert creator Mr. Yue Wang.
Lots
- Fixed 0.5 - 1 standard lot for every $10K Balance is preferred. Well control the risk.
MagicNumber
- Your favorite number.
Use slippage protection
Select true or false. Default value is true. In case you activate this protection mechanism, you must to specify the values of:
- close 50% position when slippage (points) - when slippage is higher than X points, the expert will close 50% of the open position. Default value is Y=5.
- close 100% position when slippage (points) - when slippage is higher than Y points, the expert will close 100% of the open position. Default value is Y=7.
Use spread protection
Default value is true. In case you activate this protection mechanism, you must to specify the values of:
- close 50% position when Spread (points) - when spread is higher than X points, the expert will close 50% of the open position. Default value is X=5.
- close 100% position when Spread (points) - when spread is higher than Y points, the expert will close 100% of the open position. Default value is Y=7.
- Cancel pending order when Spread (points) - when spread is higher than Z points, the expert will delete latest pending orders. Default value is Z=100.
- Automatic trend detector - helping expert to detect the trend direction of very short term period. if have possibility of trend reversal, the expert will exit the trade no matter with win or lost. Strongly recommended to select "true" of the "Use Automatic Trend Detector" steps 1-6. Default value of these steps is "true".
Dependencies
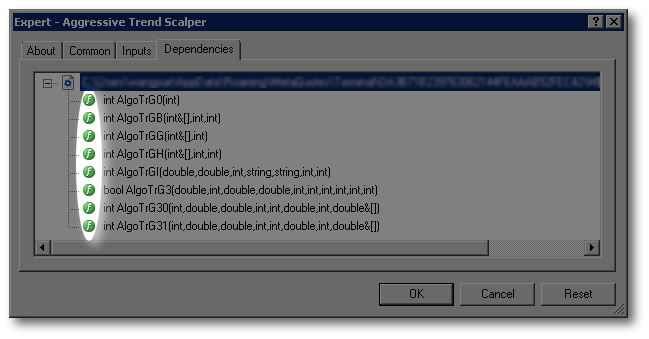
This tab exists only to know that the expert work as expected. There are no configuration parameters. The all lines must be green, as on the above picture. The lines with different colors are indicator of problems. If you see lines with problems, immediately stop trading with the expert. Trading with unsatisfied dependencies will lead to unpredictable results. At such situations immediately contact the NextPointHost 24/7 Insanely fast support with a heart. The support agents are available 24/7 for Live Chat or Ticketing support.
About
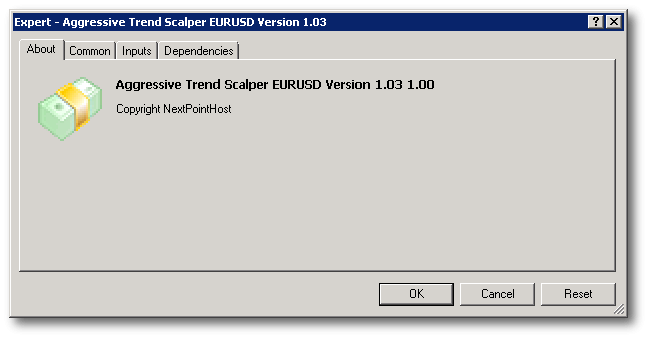
Here you can see the version of the expert and additional legal information.
Trading conditions for the optimal results
The Aggressive Trend Scalper is great expert with professional financial logic. It uses the experience of professional forex traders and latest software technologies. It's making profitable forex trading much easier task. Unfortunately in live trading nothing is 100% sure. There are many things, which are out of expert's control. All them can affect the order execution and as end result to the profitability. For example - Slippage, sudden spread spikes and trading costs, depend from the forex broker. Lost of connectivity to the trading server or restarting the PC, where the expert is installed depend from your local providers of internet, electricity and from the stability of your home PC. To achieve the best results, you need stable and reliable environment. The environment with 99.9999% uptime guarantee. The same environment which forex brokers use. That's why I, Yue Wang created checklist with prerequisites that guaranteed best trading results.
- Buy forex vps server with 99.9999% uptime guarantee. This vps is at the same data centers where the broker's servers are located. It have ultra low latency and direct connection to the trading server.
- Choose forex broker who cover these requirements:
- Stops level: 0 points. If your stop levels are higher, please let me know. I have special version of the expert.
- Commissions: The lower the better.
- Spread: no higher than 5-8 points. The lower the better.
- Slippage: The lower the better.
Check my trading
Stops Level
An unknown parameter for most forex traders. However It has a great influence on the way of trading. Some forex brokers use this “unknown” parameter as a mechanism to influence their customers' trading. Pay special attention to the value of “Stops Level” in order to be sure that the expert will achieve the desired results. The parameter define minimum value where traders can set pending orders like “Take Profit” and “Stop Loss”.
Example
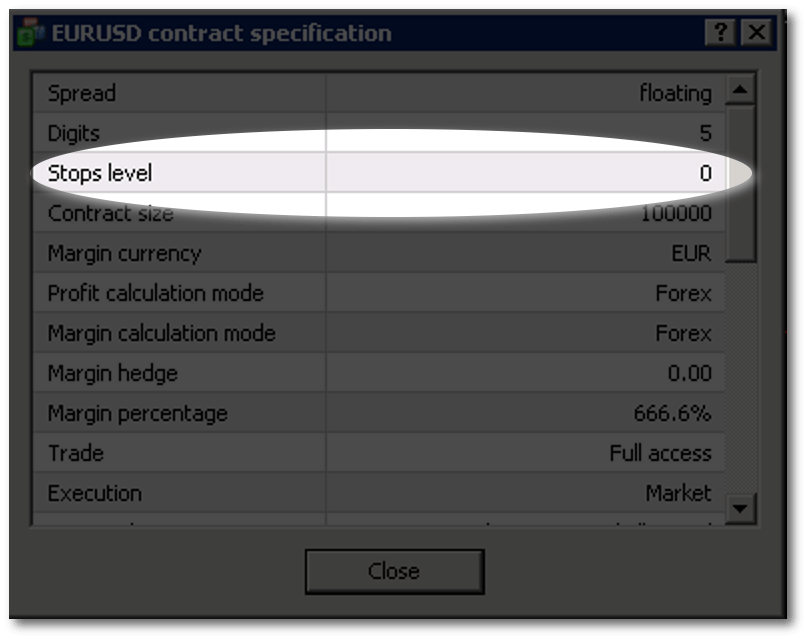
If the “Stops Level” is 1 pip, then traders cannot set any types of pending orders closer than 1 pip to the current market price. In this case, the platform will return the “Invalid Stops” message and will not accept the order. The recommended value “0” indicate that the broker doesn't have “Stops Levels”. In other words you can set “Take Profit” and “Stop Loss” orders anywhere you want without any limitations. Its value can be seen as follows:
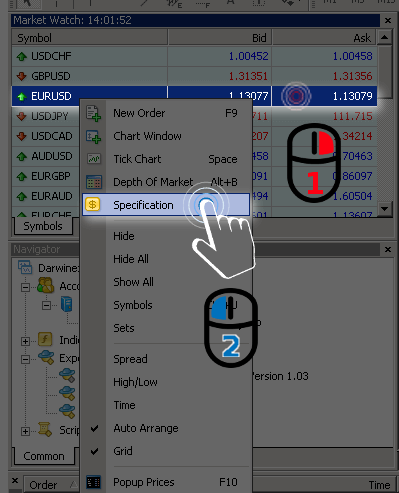
Market Watch window
Right click on the desired currency pair. In current example it is “EURUSD”. On the context menu, left click on the “Specification”. You'll see the “Contract Specification” window, where on 3rd line the “Stops level” value is written.
Commissions
MetaTrader platform can not visualize how much are the commissions of your broker. This information usually is available on the broker's website or inside the contract with the broker. The rule is the less is better. Make the research and choose broker with as lower commissions as possible.
Spread
the difference between Bid and Ask prices. It is calculated in pips. Spread could have a significant impact on the profitability of the trades.The size of the spread is an important factor during trading, because high spread results in a significant share of loss to the client during active trading. Brokers, operating in Forex and CFD markets, offer their clients two types of Spread - Fixed and Floating.
Fixed spread
Does not change depending on time or general market fluctuations and volatility. However, in case of low liquidity and high volatility the spread may temporarily be changed, i.e. be transferred to the new fixed spread level; when the market returns to its normal condition the spread is changed back to its general level. Despite these rare situations trading with fixed spread is more convenient and beneficial for clients, as it is more predictable, thus less risky. On the other hand
Floating spread
is a constantly changing value between Ask and Bid prices. Floating spread is a completely market phenomenon and, most of all, interbank relations are characterized by it. Thus, along with the usual trading accounts with floating spread, a number of companies offer clients so-called ECN accounts (Electronic Communication Network). ECN Forex broker provides a platform where participants (banks, market makers and private investors) trade with each other, by placing buy and sell orders in the system. As usual, clients have unpredictable spread trading on the ECN platform, but at the same time, they pay commission to the broker during their operation. In general, if comparing two types of spreads and deciding which spread is more beneficial for clients, from our point of view - it is the fixed.
Aggressive Trend Scalper can trade with both kind of spreads.
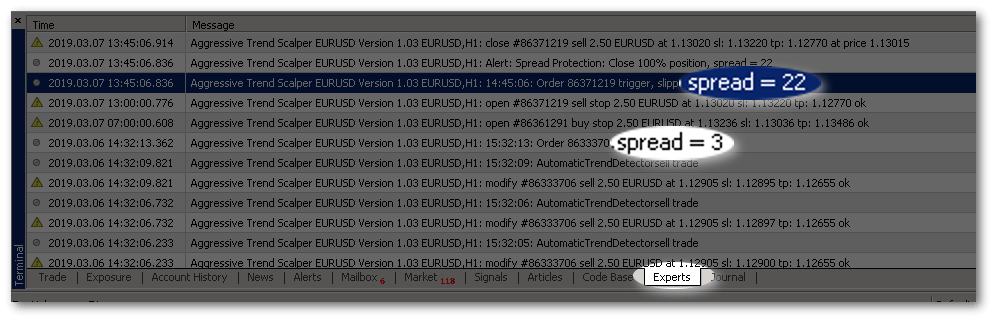
For best results choose broker with no higher than 5-8 points. The lower the better. Keep in mind that sudden spread spike will do great harm to pending orders. You can see spread of the orders from logs inside "Expert" tab.
As extra protection mechanism, when you trading with floating spread Mr. Yue Wang created the indicator "Spread Monitor" and "Spread Shield EA".
Spread Monitor
Could monitor the spread of one pair dynamically two times per bar and record it as csv file in the MQL4-Files-Monitor spread folder.
Spread Shield EA
Could check the spread automatically and delete the nearest pending orders when spread is higher than the pre-set level, but do nothing to other pending orders. For more information about these experts click on the links containing their names.
Slippage
Happens when a trader gets a different rate than expected between the time he enters the trade and the time the trade is made. It is something that can happen to any trader, whether he's trading stocks, currencies or futures. While you can't always avoid this spread between your entry and exit points, there are times when you can miss big slippage points. It's easy. Use high quality forex server with ultra low latency connection to brokers' servers. You can expect to see the most amount of slippage when major events are taking place. For example when the Federal Market Opening Committee (FOMC) is making an announcement or big political events occurs, like starting wars and etc.
Final thoughts
Probably You are already done everything explained in series of tutorials dedicated to Aggressive Trend Scalper. Now it's time for action. Start the expert and enjoy of earning profits. Of course don't forget to bookmark the permalink as future source of information.
At the left navigation menu you will find links to additional useful articles. They'll give you detailed knowledge about automated trading systems and forex trading as whole.
Don't forget to Share
On all possible places! Use the buttons with logos of different social networks to the right on PC screen. If you use a mobile device, the buttons are located at the bottom of the screen. Share it inside all social networks! Share it inside the forums! Share the link on your website! This simple step will help us to create more new articles in the future. Thank you for the support! In case you still have additional questions, feel free to submit them as comments to us.
We are constantly updating that section with new tutorials.
Enjoy of the reading!